# User Guide

This section illustrates how to create the various [**Behavior Tree**](/ai-tree/basic/behaviour-tree.md) assets within Unity.

Behavior Trees are essentially the Is processor and can make decisions and execute various branches based on the outcome of those decisions. Now an example of creating a simple bot will be shown:

### Creating Behavior Tree

Behavior Trees are essentially the AI's processor and can make decisions and execute various branches based on the outcome of those decisions.

Click on the **Assets** tab, then select **Create/Renowned Games/Behavior Tree**

<figure><img src="/files/iT6BUBQ0rlYZeOkFzl1J" alt=""><figcaption><p>Creating Behavior Tree</p></figcaption></figure>

{% hint style="info" %}
Also you can right-click in the **Project** **Window**, then select **Create/Renowned Games/Behavior Tree**
{% endhint %}

The new **Behavior Tree** asset will be added to the **Project Window** which you can rename to your desired name.

<figure><img src="/files/xtwzDE8wAnJ8bfqsqlEJ" alt=""><figcaption><p>Behavior Tree Name</p></figcaption></figure>

### Creating Random Position Task

To create [**Random Position**](/ai-tree/nodes/tasks/navmesh/random-position.md) node, we need to go to the desired **Behavior tree** and right-click the context menu.

Click on **Create Node/Tasks/NavMesh/Random Position**

<figure><img src="/files/mkMsSKUPffnsjszKgFau" alt=""><figcaption></figcaption></figure>

To save the position value we need to create [**Blackboard**](/ai-tree/basic/blackboard.md)**.**

### **Creating Blackboard**

Click on the **Assets** tab, then select **Create/Renowned Games/Blackboard**

<figure><img src="/files/kLHST2B0SUd6y8YttWIL" alt=""><figcaption><p>Creating Blackboard</p></figcaption></figure>

{% hint style="info" %}
Also you can right-click in the **Project** **Window**, then select **Create/Renowned Games/Blackboard**
{% endhint %}

The new **Blackboard** asset will be added to the **Project Window** which you can rename to your desired name.

<figure><img src="/files/qij6sRGMQG1qjdSlYPG3" alt=""><figcaption><p>Blackboard name</p></figcaption></figure>

### Connecting Blackboard in Behavior Tree

To connect **Blackboard** to the **Behavior Tree**, click on the **Behavior Tree** we need and drag the desired **Blackboard** into the **Behavior Tree** inspector window where the **Blackboard** field will be.

<figure><img src="/files/cOx1ZnfvC5HBJWXvNDaA" alt=""><figcaption><p>Behavior Tree Inspector</p></figcaption></figure>

{% hint style="info" %}
You can also add it by clicking on the field with blackboard and select it from all the blackboards in the project.
{% endhint %}

<figure><img src="/files/t7Q7CumV4Az8l1qCOzYx" alt=""><figcaption><p>Connecting Blackboard in Behavior Tree</p></figcaption></figure>

### Creating Keys for Blackboard

In the **Blackboard**, we create a **Key** with the vector type and call it *position*.

To create a **Key**, click on the **New Key** tab.

<figure><img src="/files/GA6CjRjVxTmO3iPPs5VW" alt=""><figcaption><p>Creating new Key</p></figcaption></figure>

In the window that opens, select the **Key** type.

<figure><img src="/files/AJ45pcQWmBM7MN37SXxJ" alt=""><figcaption><p>Selecting Key types</p></figcaption></figure>

An example of how it should turn out:

<figure><img src="/files/Z5h2Vn1uRqjHDFOoxFJU" alt=""><figcaption><p>Creating position Key </p></figcaption></figure>

In the **Random Position** node inspector window, specify your new **Key.**

<figure><img src="/files/OqsUnqzwqr5nIrkfNPIt" alt=""><figcaption><p>Assigning new Key in Task</p></figcaption></figure>

### Creating Move To Task

So that our character can approach the generated position, we will create [**Move To**](/ai-tree/nodes/tasks/navmesh/move-to.md) node.

To create **Move To** node, we need to go to the desired **Behavior tree** and right-click the context menu.

Click on **Create Node/Tasks/NavMesh/Move To**

<figure><img src="/files/1XpBPJ0REAK8wpg8kMvZ" alt=""><figcaption><p>Creating Move To Task</p></figcaption></figure>

In the **Move To** node inspector window, specify *position* **Key.**

<figure><img src="/files/uHKt3QDRrJKaI37WDXZq" alt=""><figcaption><p>Assigning new Key in Task</p></figcaption></figure>

### Creating Wait Task

To create a small delay, we will create [**Wait**](/ai-tree/nodes/tasks/common/wait.md) node.

To create **Wait**, we need to go to the desired **Behavior tree** and right-click the context menu.

Click on **Create Node/Tasks/Common/Wait**

<figure><img src="/files/yD4G32GGZ7QMrUKBe7m4" alt=""><figcaption><p>Creating Wait Task</p></figcaption></figure>

As in **Move To Task**, we add the *position* **Key**

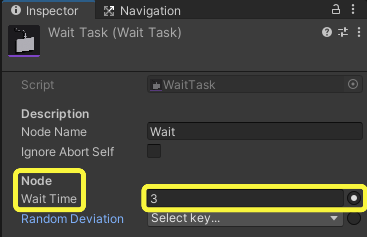
In field Wait time specify 3 seconds.

<figure><img src="/files/Cf4uT7V6uHv1y6hbeKSJ" alt=""><figcaption><p>Filling Wait Time field</p></figcaption></figure>

{% hint style="info" %}
If you don't want to create a **Key** in the **Blackboard**, then you can click on the flag next to the field and enter your fixed value.
{% endhint %}

### Creating Sequencer

<figure><img src="/files/DDLPCgTZLF00uolqcXXS" alt=""><figcaption><p>Now our tree looks like this.</p></figcaption></figure>

To link our years we need to add [Sequencer](/ai-tree/nodes/composite/sequencer.md). Executes child nodes alternately.

To create **Sequencer**, we need to go to the desired **Behavior tree** and right-click the context menu.

Click on **Create Node/Tasks/Composites/Sequencer**

<figure><img src="/files/TWMOR0NyVKCNHP5N7Jyk" alt=""><figcaption><p>Creating Sequencer</p></figcaption></figure>

### Linking Nodes

To link a node, you must pull the connection from the top or bottom of the node (indicated by a circle) to the center of another node.

<figure><img src="/files/2Ulx7dzop1vLehWtcQlG" alt=""><figcaption><p>Link example</p></figcaption></figure>

{% hint style="info" %}
Connecting nodes in **Behavior Trees** only work by connecting an output to an input (you cannot connect from an input to an output).
{% endhint %}

We connect the remaining nodes in the same way:

<figure><img src="/files/0b6aa8R0hDLC5eQTOI8M" alt=""><figcaption><p>Links example</p></figcaption></figure>

### Connecting Behavior Tree with GameObject

To connect **Behavior Tree** to GameObject, we need to add a component to it Behavior Runner.

To do this, go to the inspector window of the necessary GameObject.

Clicks Add Component and searches Behavior Runner.

<figure><img src="/files/dG6RYjsctcPduvau7vec" alt=""><figcaption></figcaption></figure>

In the Behavior Runner field, connect our created **Behavior Tree.**

<figure><img src="/files/fxluszqis5K5opMak72p" alt=""><figcaption></figcaption></figure>


---

# Agent Instructions: Querying This Documentation

If you need additional information that is not directly available in this page, you can query the documentation dynamically by asking a question.

Perform an HTTP GET request on the current page URL with the `ask` query parameter:

```
GET https://renownedgames.gitbook.io/ai-tree/basic/user-guide.md?ask=<question>
```

The question should be specific, self-contained, and written in natural language.
The response will contain a direct answer to the question and relevant excerpts and sources from the documentation.

Use this mechanism when the answer is not explicitly present in the current page, you need clarification or additional context, or you want to retrieve related documentation sections.